ARTICLE: Dorm Manager Module with Flexi-Boarding
The Dorm Manager module allows you to build a digital representation of your physical accommodation resources which can then assist you to manage room and bed allocation for full time and casual boarders.
The Flexi-Boarding component provides for a room booking and allocation system that allows parents to engage directly within REACH to request short-term bed placements and for staff to manage these resources.
Accommodation Manager
In order for REACH to know what beds you have available throughout your boarding facility, it first needs to be set up so that your digital profile in REACH replicates your physical boarding resources at your facility or facilities.
Create Boarding Resources
Go to System Configuration > Accommodation Manager
Add New Buildings
The example image displays the two dorm buildings that have been setup already.
Each dorm is provided buttons to manage these buildings.
View - to quickly view the building data or to add floors
Edit - the update the details of the building, or to delete the building
Add New Floors
Any building, once created can then have new floors added, simply click the 'View' button.
The image shows the room and bed details for level one. Click the View button to manage these details.
The pop-up provides two quick fields to setup a new floor. It is helpful to label each floor with the level details.
The Ordinal dictates the placement in order.
In this example, creating a new level for the Watson building, label it as 'Watson Level 2' and the ordinal as 2. Click Save.
The new floor appears, continue to add additional floors are required.
Add New Rooms
Click 'View' on the new floor you have created, and click on 'Add new room'.
The pop-up provides two quick fields to setup a new floor. It is helpful to label each floor with the level details.
Give the room a label and click 'Save'.
Add other rooms as required in the same way until all your rooms are in place.
Two rooms have been added here - ONE & TWO
Add New Beds
Enter the label for the bed and select the bed type (size) from the dropdown list and click 'Save'.
In this example the beds will be free.
Dorm building Watson, Level 1, now has 4 bedrooms, with beds added to each room.
Accommodation General
Once you have your accommodation resources setup and ready to receive students, Reach needs to define how it interact with those students that are checking in and out of accommodation.
Check-in
Day students will need to check-in to boarding on the appropriate day in order for Reach to then recognise them as a boarder and not a day student, similarly when they check-out of boarding and become a day student again. Parameters are required to be set to create an expectation within the system.
Go to System Configuration > Accommodation Manager
First, the time of day needs to be set, when students can check-in to boarding and check-out of boarding.
From here you can set a time restriction on when a day student can check-in and check-out.
If you do not want to restrict when this can happen then leave the 'Enable Restriction' button unchecked, this will then allow day students to sign into and out of boarding at any time on the booked day.
Checkpoint Window Buffer - this operates similar to the airport screen, allowing bookings to stay on screen for a period of time.
Residential Roles
Reach treats students differently dependant upon their role; restrictions, access and representation on common actions such as roll calls and meal counts are all dependent upon the student role within Reach. Students will typically fall into one of two broad categories:
- Full-time Boarders
- Non full-time boarders (day, flexi, etc.)
The roles that the school wants to define students by can be set up via the Residential and Non-Residential Role boxes provided here in the system configurator. As previously mentioned, a student can become a 'Boarder' when they check-in and then change to 'Day Student' when they check-out.
Click 'Save Changes' when completed.
Managing Accommodation Resources
Once you have configured the buildings, floors, rooms and beds, they should be laid out in Accommodation Manager similar to the image below:
Placing Restrictions
Now that the resources have been laid out, it is time to place some restrictions on who can be booked into a particular bed.
Click on the bed you want to place a restriction on (either by clicking the bed or the tick box in the first column, you can select multiple beds) and then click on 'Edit Restrictions'.
Bed Allocations
There are two ways of a student being allocated a bed, manual allocation where staff can book a student into a bed and remote booking where a parent or guardian can remotely request a booking and the system automatically allocates them the next available bed.
Manual Allocation
First task is to set up your full-time boarders and allocate them into their beds so that the system will not allocate flexi boarders into them. Select the bed that you want to allocate your full-time boarder into a click on 'Allocations' in the right-hand column.
Remote Booking
The desktop booking form is accessed through the 'Accommodation' item in the Main Menu on the right of the screen.
When the new dialogue box opens, click on 'New Booking'.
Click on 'Add Allocation' and enter Start/End dates for the booking and click on 'Add'. Multiple requests can be made of the same item, just click on 'Add Allocation' each time and enter the dates. Click on 'Save' to complete the request.
The request is then sent for final approval by the relevant member of staff within the 'Accommodation Manager'.
The staff member can 'Confirm' the booking or decline it by clicking 'Reject'.
Once confirmed the booking will then appear in the allocation as confirmed.
Checking-In and Checking-out
When it comes to the day where the student has an approved stay in boarding they can check-in to boarding.
Note: If any restrictions on check-in times have been set in the accommodation configuration then the student will not be able to check-in until the set time.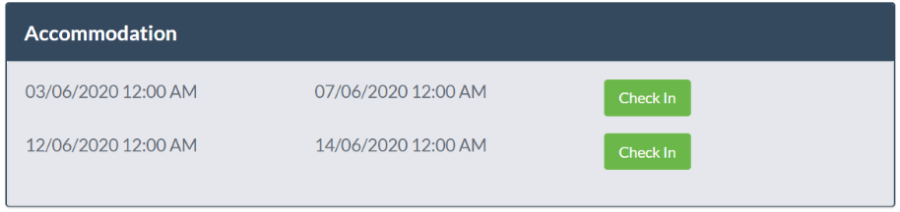
Check-in is performed via the 'Kiosk View', details of the students with available check-in will viewable on the 'Accommodation' widget .
Once they have checked-in, the allocations listing will display the time stamp of the check-in.
Once successfully checked-in, the student will change role to as per your system configuration settings, typically a boarder and therefore appear on roll-calls, SiSo screens, etc. as per a normal boarder.
Similarly, when the student check-out of boarding, go to 'Kiosk View', find the student, and using the 'Accommodation' widget, click on 'Check-out'.
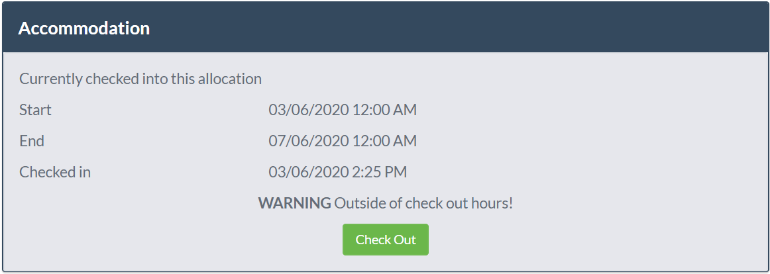
In both cases if the check-in or check-out is outside of the permitted time, then an alert will appear in the Accommodation widget.
Once checked out, the student will change role and no longer appear in roll-calls, SiSo screens etc.
Related Articles
ARTICLE: Setting up the Accommodation Manager
Overview Schools are looking at ways to maximize the boarding resources they have available to them in order to provide a service to parents that wish for their children to reside at school either full-time or on a more flexible basis. A requirement ...ARTICLE: Instant Reports – Accommodation Report
Accommodation Reporting generates data derived from specified parameters throughout a chosen Date Range. Go To: Reporting >> Instant Reports >> Accommodation Report Please Note: This reporting feature is part of the larger Dorm Manager Extension ...ARTICLE: Managing Accommodations
Allocating a student to a bed Full time boarders can be allocated into their beds on a manual basis so that they don’t then appear in the options for flexi-boarding. Navigate to Accommodation > Accommodation Management and find the bed you want to ...ARTICLE: Create a Booking
Create a New Booking Parents can create a boarding booking via the portal by logging onto a browser and creating a new booking via the accommodation widget. To create a booking, click on ‘Create Booking’ to bring up the new booking screen. Select the ...ARTICLE: How to Add a New Student to Reach
New student profiles can be created / edited / deleted at anytime within your schools Reach portal. GO TO: People Management >> View Contacts >> Add New Contact NOTE: Use the search bar within the People Management screen, to check if your new ...