ARTICLE: Staff Mobile App User Guide
Mobile App User Guide
The Reach Mobile App is designed for use as a transaction platform, it is free and is available for use by all users with an account on your Reach Portal.
Access to the Reach Mobile App
The Reach mobile app is a free app that is available for use by staff/faculty, students, and parental users of Reach.
User Type Experience
Once you have a profile created via the Reach Web Portal, your login will be set, at this point, you also have access to the Mobile App. The features that are available to your login are dependent on the user type; student/parent or staff/faculty user. Additionally, the accessibility permissions set in your profile affect the features available for you as a user of the Reach Mobile App.
Download the Reach Student Life App
The App is available to download for Android and Apple devices. Search for 'Reach Student Life' App in either the Google Play Store or iTunes store.
KB ARTICLE: How to Access and Use Reach on your Mobile Device
Using the Mobile App as Web Service App
As an alternative to downloading and using the native mobile app from a web store, you can also use the browser on your mobile phone or tablet to use the web service app. Simply go to https://material.Reach.cloud on your device browser for access. Share the web page to your home screen or desktop for an identical experience to downloading the native mobile app.
Logging In
Sign-in to your schools Reach Portal - Open the App, Click the Lets Go button, Search for your school name.
Login Credentials
Your School may use a Single-Sign-On option or OAuth with Google or O365, then select the relevant Sign-in option. Your Administrator may need to switch this on via the Web Portal, to activate.
Go to: System Configuration >> General >>Allow SSO via Google

Essential Security information
Your Reach login provides you with access to important, private, and secure information about staff, students, and parents in your boarding community. It is vital that you access Reach from a secure portal and only with your login to meet data privacy regulations and it is vital that you do not share your login details.
Sharing your Reach access login with unauthorised users may create a reportable breach of privacy incident for your school.
Navigating the Mobile App
Firstly, as shown in the example images, the home screen is sectioned into ‘Cards’ for fast access to the main areas of Reach. The ‘Cards’ presented will differ with the type of login and active permissions per user.
Each item is detailed in the relevant section of this document.

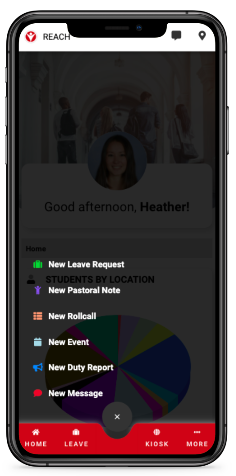
Metrics View / Home Screen
The Home Screen is your base Metrics View and launch point for the main functions of the Mobile App Portal.
You are welcomed to the App with a greeting, your school logo, the background image of your school, and most importantly your current logged location, in this example, On Campus with a colour dot that represents the colour set for that location throughout Reach.
To change your current location, simply click on the Location Pin Icon in the top right corner, this will open your locations page that is separated into Off / On Campus, click your new Location to activate.
Activity Metrics
Departure – number of approved leave events for sign-out today
Arrivals – current off-campus student number, this also includes those with approved leave and are scheduled to return today
Pending Leave – how many leave requests are waiting approval
Approved Leave – number of approved Leave items in the system
Manage Leave button – allows you to view / approve / reject current Leave Requests within your system
- This is further detailed in the Manage Leave section of this document
- Extended information is found within the KB ARTICLE: Manage Leave in the Mobile App
Create Leave button – will take you through a simple page by page process to Create a New Leave Event quickly and easily for one student or multiple.
Students by Location
If you tap-and-hold a segment of the pie, a pop-up will show you the current student number for that Location. If you tap on a segment or a colour bar, the Kiosk page will open to a scrollable list of students at that location, your actions are then similar to the Web Portal Kiosk.
Go To Kiosk – This button directly opens the Kiosk to view all students and their current details. The features and functionality of the Kiosk Screen are detailed in the section below.
By Location – This button opens the list ‘Students By Location’ page showing the current and maximum numbers per location, to tap on a location will open the scrollable list of students at that location
This panel lists the upcoming scheduled rollcalls for your school.
The Rollcall button once tapped will take you to the Rollcall Setup screen where you can submit Rollcalls. The toggle within the Rollcall section allows you to switch between Live and Standard Rollcalls.
The Rollcall Screen section below details the functionality of this feature.
Events
Via the Mobile App, this section is mostly an information-based area, however, the action of registering attendance can be done here by Students and Parents. In their app for Staff, they can see Upcoming Events and Events they are scheduled to be the Supervisors.
The following images show the varied appearance with a different Role Type login access.
The Parental login allows access, only to students with previously proven authority. In this case, the three sections detailing information for those Students that (Blue) ‘can register’ (Green) ‘are registered’ and (Yellow) ‘are waitlisted’ for events available to them.
The Events section below details the functionality of this feature.
Pastoral Reports
The Pastoral Card allows you to view or create Pastoral Notes and Reports.
Tap on the View Notes button to access recently submitted pastoral notes. Items will list with a colour reference indicating the cardinality of the pastoral record, tap a report to open and view.
Tap on the Create a Note button to jump straight into the Pastoral Report form to add a new Note or Record for any student(s).
Duty Reports
The Duty Reports Card allows you to view or create Duty Reports as required, quickly and easily.
On the face of the Card, the most recent Report submitted by your team is highlighted in the middle, tap on this item to open directly into the details of that report.
Tap on the View Reports button to access recently submitted Reports. Items will display in chronological order, tap a report to open and view.
Tap on the Create Report button to jump straight into a new form to create and submit new details.
Communications
The Communications Card is your access to the Reach: Now feature.
Reach: NOW is an extension module that must be enabled for your school's portal and infinity permission settings enabled per user.
To Do’s
This Card is your access to the Reach Surveys feature.
If a daily survey has been created for you to complete, a pop-up notification will appear once you login to the app.
Tap on the Surveys button to access all surveys that have been created for you to complete, these may include Voting for End-of-Term awards, or General Health & Wellbeing. Follow the simple layout to complete and Submit.
Tap on the Lists button to access the Lists that have been created by your school, these may include a Daily Transport List, or Afternoon Activities. Follow the simple layout to complete and Submit a List.
The MORE section further details the functionality of Surveys And Lists within the Mobile App.
Upcoming Birthdays
Kiosk Screen
The app version provides three distinct Tab Views with access to; All students, scheduled Departures, and scheduled Arrivals.
- ALL shows all students according to your filter settings
- DEPARTURES show approved departures for the coming 24 hours
- ARRIVALS show current off-campus students that are expected in the next 24 hours
Late students to depart or return will be highlighted in Red.
Soon to depart or arrive students will be highlighted in Green (<15 minutes)
Navigating the Kiosk
- Search By Name
- Filter by House-Dorm / Year-Grade / Location / Group
- **The icon will show a red dot to indicate one or more filters are currently in use
- Filter Alphabetical
- Bulk Select and Deselect
- **This will change from single to double when using an Individual Student Tile
- Profile Photo
- Student Name
- Current Year/Grade and House/Dorm
- Current location is shown by the colour ring around their profile photo and stating the corresponding name of that location, as shown by the red arrows.
Tap on the student card to reveal red icons
- Opens Quick individual student SISO
- Direct message via SMS/PUSH/EMAIL, or call
- This is detailed in the Communications section
- Quick access to individual student profile information
- This is detailed in the Student Profile section
- Opens directly into a New Leave Request for that student
- This is detailed in the Manage Leave section
- Opens into a New Pastoral Report for that student
- This is detailed in the Pastoral Reports section
Individual Student sign in or out
- Simply Tap on the Tile of the required student
- The Red Action Icons appear
- Tap the Location icon and the Quick SISO screen will open
- Here, the current location of the selected student is shown at the top as ‘Bikeriding’
- Available on this screen are the Cards to set a ‘NFC’ or ‘QR’ SISO
- To Program an NFC in the Mobile App, this is explained in the MORE section
- SISO the student to their ‘Next Leave Request’ can also be done with the quick link
- This will show a confirmation pop-up, checking if you want to Sign-Out that student to the next registered Leave Request in their profile
- Following below are is the alphabetical listing of locations, as managed by your school, separated into On and Off-Campus.
Bulk Sign In or Out
This process is similar to the Web Portal and is still fast and simple.
A and B will now detail the two main routes to move groups of students.
- Tap the Filter Funnel icon and select the required group. This image shows the ‘Boarding House’ group has been selected
- The group appears, all indicating the same green ring around the profile images
- Now tap the Check Mark icon, this will change to a double Check Mark
- All profile images will change to Large Check Marks
- A red square will appear above the PLUS icon indicating the total number of students selected, the entire group
- Tap the Red Square, the Locations pop-up will appear for you to select the new location
- The Kiosk will save and update directly
- The current students shown are the general population listed in alphabetical order
- Their current locations differ as shown by the colour ring around their profile image
- Individually Tap on the profile images of each student required
- The images change to Large Check Marks and the Red Square appears
- Once you have all the required students selected
- Tap on the Red Square to show the Location pop-up, for you to select the new location
- The Kiosk will save and update directly
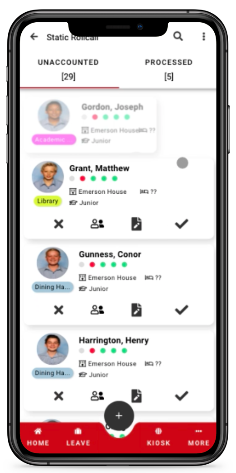
Rollcall
Rollcall can be taken and processed through the Reach app in one of two ways; Live Rollcall and Standard Rollcall. Live Rollcall will allow staff to work in collaboration with other staff members to quickly and efficiently account for students in one or multiple locations, enabling others to see real-time updates regarding students' whereabouts. Standard Rollcall allows for one user to log attendance for a group as one event, and other staff won't be able to see the results of a Standard Rollcall until after it has been completed and submitted.
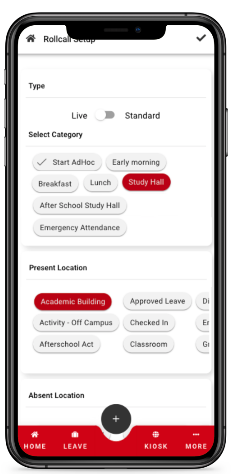
How to Setup a Live Rollcall
Select the bottom center PLUS sign button and choose New Rollcall
Select the Category (required)
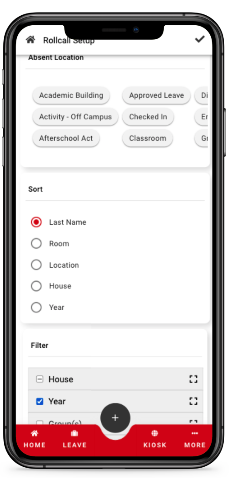
Select a Present Location - this will be the location students will be SISOd to upon being marked present in the Live Rollcall (optional)
Select an Absent Location - this will be the location students will be SISOd to upon being marked absent in the Live Rollcall (optional)
Select the field to Sort by which determines how you will view your students in your Live Rollcall (Name/Room/Location/House/Year)
Select Filters which will determine which students will be visible in your Live Rollcall (House/Year/Group/Location)
Select the Check Mark in the top right corner to being your Live Rollcall


How to take a Live Rollcall
- Selecting the Note icon allows for the logging of a note for that particular student
- The initials of the staff member who accounted for the student will appear below their name in the colour of the student's status
- View how much time remains until the end of the Live Rollcall session
- Toggle between viewing all, processed and unaccounted students by selecting the double Check Mark to the left of the time counter
- Use the search feature in the top right of the screen to quickly display a particular student
- You can update the status of a student by selecting another attendance option
- This may happen if another staff marks a student absent and you can account for them in your location, you can change their status from Absent to Present, or Account for by Another.
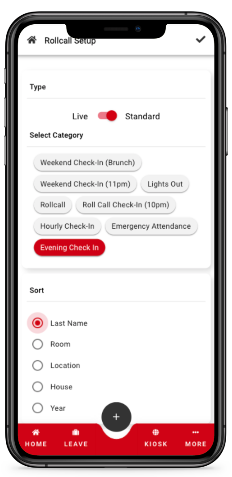
How to Setup a Standard Rollcall
Select the bottom center PLUS sign button and choose New Rollcall
Toggle the Type switch to enable Standard
Select the Category (required)
Select the field to Sort by which determines how you will view your students in your Standard Rollcall (Name/Room/Location/House/Year)
Select Filters which will determine which students will be visible in your Standard Rollcall (House/Year/Group/Location)
Select the Check Mark in the top right corner to being your Standard Rollcall

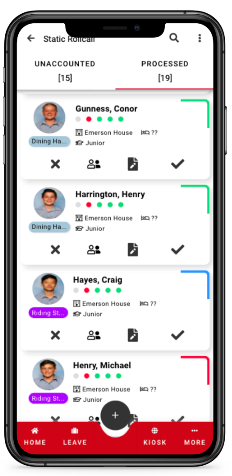
How to take a Standard Rollcall
Marking a student Present, Absent/Late or Accounted for by Someone Else
If another staff member has marked a student Present Absent/Late, or Accounted for, this can be highlighted
Selecting the Note icon allows for the logging of a note for that particular student
Toggle between all, processed and all unprocessed students by selecting the corresponding tab
The numbers under the tab titles refer to the number of students in that category
Use the search feature in the top right of the screen to quickly display a particular student
You can update the status of a student by selecting another attendance option (this may happen if an absent student arrives late for the rollcall and you need to now mark them present)
If you need to navigate away from the Rollcall screen, you will be asked if you want to save a draft of this current Rollcall. Saving a draft will allow you to return back to this screen and continue taking your Rollcall with the previously processed students already accounted for
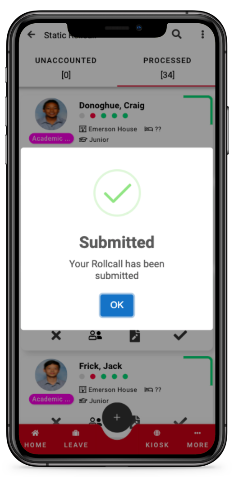
To submit your Rollcall, select the three dots in the top right corner and select Submit.

Rollcall Control Icons
- Clear Rollcall & Submit again will clear any processed data on your screen allowing you to start over with a new Rollcall
- Filter By allows you to adjust the student list for your Rollcall. Your default filtered list will be the same as any settings that you have in the user's Groups Managed
- Submit is the completion of your rollcall and the submission of you marking the Rollcall report
- Submitted rollcalls will be saved to the system as historic information. You can only submit a Rollcall when "all" students in your list have been marked (processed)
- Save allows you to save an incomplete Rollcall that is not yet submitted and return to it later to complete
- Cancel allows you to cancel any Rollcall that is incomplete
Events
Reach Events is an Extension Module and was created to provide an efficient management tool for organising, sharing, and managing recreation activities, excursions, or events being held by your school. When Events is activated, you can create an unlimited number of Events that can be made available for any group within your Reach Portal.
The Parental login only allows access to students with previously proven authority.
In the following screenshot examples, we use the Parental Login to explain the functionality. This functionality will be similar for each Login Type.
How to Navigate Events
Once Events is open, you will be presented with Tabs across the top, again, this will differ per login type.
In this Parental Login example, we are presented with; Discover, Calendar, and Events
- The Parent in this example has management access for four students, as can be seen by their names at the top, currently the Discover section is showing the Events available for the student highlighted red
- Simply tap on another student to view their Events
- The first Event ‘Card’ that can be seen is showing a Blue Dot at the title, indicating it is an Open Event and the student ‘Can Register’ for this Event
- The current Event shows the Reach Logo by default as the Event image. When creating an Event, an image can be added to represent your Event, and video files can also be loaded in the information section
- If you scroll down, more Event detail can be seen on the current ‘Card’
- If you Tap on the Event ‘Card’ it pop open to reveal all available information as can be seen in the image to the right. To return, tap the Return Arrow in the top left
- In the minimised or extended ‘Card’ view, the red buttons Decline & Register can be seen, simply Tap as required
- To Tap either button will instantly activate that action, showing a pop-up to confirm
Calendar Tab
- When opening the Calendar, the current Month will always show, with a Blue Dot on the current Date.
- Tap the Calendar icon to open the current Day view, Tap it again to return to the Month view
- Tap the Left/Right arrows to move per Month
- When in the Day view, this will move per Day
- Registered Events will show as a small Black Dot on the associated Date
- As can be seen in the example below, this is April 18th & 30th
- April 18th Has been Tapped
- This opens the Day view, where two events can be seen
- Bounce – Trampoline Has been Tapped
- This will open to reveal all available details for that Event
- Tap the View Attendance button
- This reveals the current status of the Event attendees, with four tabs at the top, simply tap on a tab, to show that list; Registered, Waitlisted, Declined, No Reply
- A red arrow is pointing to the student names on the left, these are the current students accessible by this parent. Tap on a student name to open their Events
- Scroll down to view the Events
- Here we can see by the red arrow on the left, this Registered Event is indicated by the Green Dot, other Events may show as still being Waitlisted as a Yellow Dot.
- The red arrow on the top right indicates a Black Arrow to the side of the title on the Card, this indicates that there are more Registered Events to view
- Therefore, you can slide the card left/right to view other Events
- If the Black Arrow is not visible, there are no more Events to view
- The red arrow at the bottom right is showing the Unregistered Button
- Tap this to withdraw from the Event
Pastoral Reports
The Pastoral Reports ‘Card’ allows you to View, Create, and Update Pastoral Notes and Reports.
Via a Staff login to the Mobile App, the Pastoral Report section will be accessible from the Home screen, simply scroll down.
KB ARTICLE: Pastoral Management
View Notes
- Tap on the ‘View Notes’ button to get started
- This will open to the Current Report page to access all Pastoral elements
- On the top Menu bar, the available Icons provide functionality and features
- Icon - Filter Funnel – will open to your standard Reach items;
- House/Dorm, Year/Grade, Locations, Groups
- Tap the left box to Select/Deselect All items in the Filter
- Tap the right box to open the list to Select/Deselect individual items
- Tap the X to close the Filter window
- Icon - Search Icon – will change the top menu into the Search Bar
- Start typing the student to search, the results, if available will appear
- Tap the X to close the Search window
- Icon - +Plus Icon – will open the ‘Create Pastoral Report’ section
- This area is explained in the next section – Create a Note
- Each item is coloured to represent the Pastoral Type, the Type name is also noted on the item, on the third line. Eg, House – Positive OR Gated - Negative
- Each item shows the Student name for which that Report is created
- The Staff Member creating the Report is also noted
- Tap anywhere on an item to open the details of that Report
- In the section at the bottom – Additional Details, tap on the highlighted text to open the View Duty Report page. This area provides all available information of that report
- Here you can update the Date/Time and Recirculate the report
- Tap the edit field under Date/Time to adjust
- Tap the X to close the Calendar window
- Tap the Paper Plane Icon to Recirculate the report
- A confirmation pop-up will appear
Create a Note
On the Home Screen, Pastoral Reports ‘Card’, tap the red Create a Note button
Alternately, tap the PLUS Icon and select New Pastoral Note
- This will open the Pastoral Report page
- This quick flow system will aid in submitting fast reports for small items
- Eg, Good/Bad Behaviour reports and Pastoral Points reports
- Tap on the ‘Search for a Student’ field, your keyboard will pop-up
- Start typing a students name, a list will appear to choose from
- Tap on the required student, you will see this add to the list
- Search for and Tap on multiple students to add more
- To remove, just tap the X per student
- When ready, tap the Red ‘Next’ button
- The next page is Select Pastoral Type
- Scroll up/down to view the selection created and managed by your school
- Once you tap an item, the system will move to the next screen.
- Only One Pastoral Type per Report to aid searching and historical reporting
- The next page is Select Tags
- These items as created and managed by your school, could by House/Dorm names, sport Groups, Study Groups
- Select the required Tag and tap the Red Next button
- The final page, show the data you created with more action items
- Scroll down to find;
- Secondary Students – to add more students
- Staff to Inform – search the Staff to send your Report to
- Date/Time – Adjust the Calendar and Time if required
- Access Level – Staff / Sensitive / Confidential
- Pastoral Score – manually add the number required
- When ready, tap the Save button to finish
NOTE: When setting up the Pastoral Points system, default points can be set for individual Pastoral Types, to automatically collate for that student. Points can still be adjusted manually when creating a report. Once a Pastoral record has been submitted, you cannot adjust the points
KB ARTICLE: Pastoral Points
Duty Reports
Create Report
- Tap the Date/Time field to open the Calendar window
- By default, the Calendar opens to the current date, alternately select a specific date
- Use the Red Up/Down buttons to toggle the required Time
- Tap the Green button to Save
- Or Tap the X to exit the window
- User – Specific Staff Members
- Group- Staff groups, as created and managed by your school
- Role – Specific Job Title Roles; Eg, Head of House, Boarding Supervisors
- Specific Student additions
- Wellness Category - Pastoral Type items; Eg, Good/Bad Behaviour
- Pastoral Score/Points addition
- Addition Notes field
View Reports
- Start typing the staff member name to search, the results, if available will appear
- This will only search the available reports in the current list
- Use the Calendar Icon to create a wider Date Range
- Tap the X to close the Search window
- Start Date / End Date fields are available to create a search range
- Tap on a Date/Time field to open the Calendar, select the required Date
- The time will stay the same – your current time
- Adjust both Start and End Date fields as required
- Tap the Tick Icon on the right to save and close the Date Range window
- This will update your Report List automatically
- The View Duty Report page is split into two Tabs, Sent & Draft
- Once you have found the Duty Report you wish to View, simply tap on that item
- As shown on the image below, that Duty Report will open to show the Basic Detail, this is generally a view-only area.
- The Date and Time can be adjusted here if required
- The Paper Plane Icon in the top right can be used to Recirculate the Report
- A confirmation pop-up will appear
- Once you have found the Duty Report you wish to Edit, simply tap on that item
- This will open into the Create Report page
- You will see the sectors of the Report that has been started
- As detailed in the Create Report section above, this Draft Edit area has the same functionality
- Edit and adjust all sectors as required
- At the bottom of this Draft page, you will find three buttons
- Delete – to permanently delete the item
- Save Draft – to save it again, where it will remain stored till required
- Submit – will Save and notify the staff selected in the Staff to Inform section
Communications
The Communications Card is your access to the Reach: Now feature, with ease of use via three methods; Direct Message Chat, interactive group Chat Rooms and posting in Noticeboards.
Reach: Now
This is a versatile tool designed to help you manage and improve communications to staff and students alike within your school community. The system provides a secure, authenticated platform where your communication records are captured and historically reportable. Internal Messages utilise your Reach portal and External Push Communications for integration to the Reach Mobile App.
This is an Extension Module that must be enabled for your school's Reach Portal and Infinity Permissions must be enabled per user.
Direct Messaging (DM)
- Live chat is restricted to Staff type users connecting with other contacts in your Reach community
- Parent-to-parent, student-to-student, parent-to-student for example, are not possible in Direct Messaging
- There are no silent conversations in Direct Messaging, as all conversations are logged in Reach.
- The conversation can be reported historically and viewed in the relevant participant’s personal profile.
- All Direct Messaging records are maintained on individual user profiles
Chat Rooms (Rooms)
- You can have an unlimited number of Chat Rooms
- Chat Rooms can be open to only Staff user types in your Reach community
- You can determine who is permitted to view content in the Chat Rooms individually
- You can determine who is permitted to contribute content to the Chat Rooms
- The comments in Chat Rooms are retained in Reach for historic reporting
- You can permit users to add rich content in Chat Rooms, including; emojis and images
Noticeboards (Boards)
- You can have an unlimited number of Noticeboards
- Noticeboards can be open to all user types in your Reach community
- Your audience cannot reply to items that are published in your Noticeboards
- Users subscribe to Noticeboards on their Reach login or Mobile App
- Subscribers receive notification alerts when information is published
- You can determine who is permitted to see and subscribe to the Noticeboards
- You can add rich content to your Noticeboards
Manage Leave
Submitting a New Leave Request
- Search for the name of the student for whom you are submitting the leave request on behalf of
- Select the Leave Type of the Leave Request
- Select the Leave Date and Time and the Return Date and Time
- Select the Leave Transport Type and the Return Transport Type
- If Reach Voyage is enabled, Voyage Transport Types will populate additional fields for completion based on your school’s Reach transportation configurations in System Configuration > Transport Types
- Also, if Reach Voyage is enabled, you can select multiple legs of transportation for departure and return. Use the Trash can under a selected transport type to remove as a transportation leg. Use the up and down arrows to rank which transport leg happens first in the departure or return
- Select the Host for the leave request
- Ad-Hoc Host, No Host Necessary and Create New Host will only be listed as options if they are enabled as settings in your school’s portal System Configuration > Leave General settings
- If enabled in your Leave General System Configurations, select if a Late Meal or a Packed Meal is required and/or if this is a Recurring Leave
- Review Leave Details in the summary and click Finished when ready to submit
Viewing an Existing Leave Request
- The main details of the leave request
- If any special meals were scheduled due to the Leave timing
- Notes entered regarding the leave
- The complete audit trail of the leave's approval process.
- any UDF’s that are associated with that student
- KB Article: UDFs Help Display Additional Information
- any Quotas for Leave Types or Locations based on that student’s allotment and usage
- KB Article: Setting Quotas in Reach
- KB Article: Locations and How they Work in Reach
Editing an Existing Leave Request
Approving an Existing Leave Request
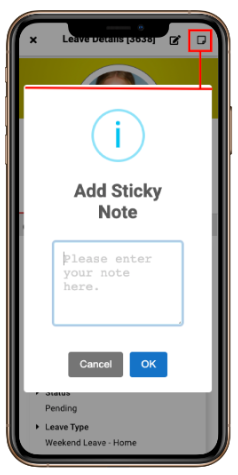
Adding a Sticky Note to a Leave Request
Resend Approval Email and Revoke Action

Approve by Proxy
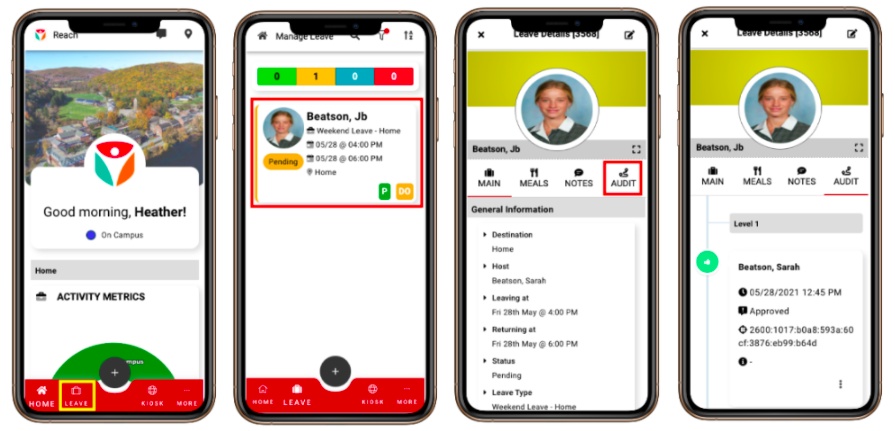
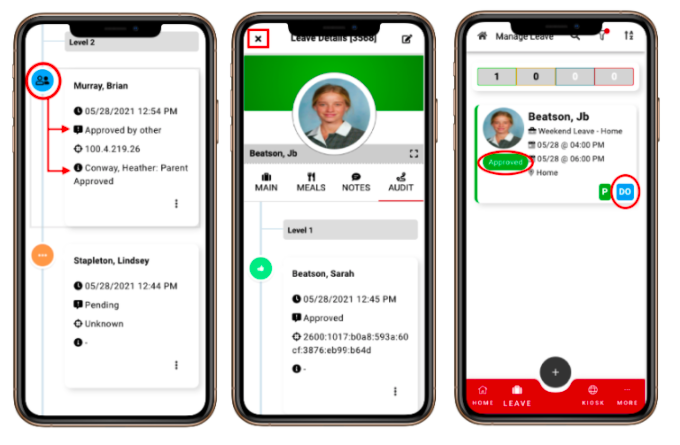
- Tap the Leave Overview tile to view the Leave Details.
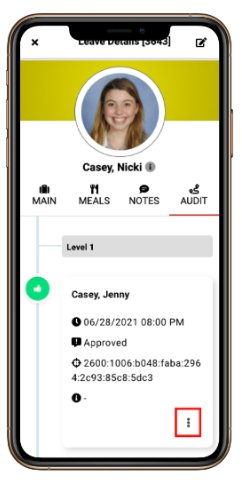
- From the Leave Details screen, tap AUDIT to view the Leave Audit Trail. The Leave Audit Trail contains information about the Actors in the leave's approval process. In this example, we can see Sarah Beatson, mother of Jb Beatson, has approved this leave request.
- Scroll down to the next actor level to approve by proxy.
- The Level 2 actors have not yet approved the leave, so the leave's status remains Pending. To approve by proxy on behalf of another person, tap the 3 dots by that person's name, and tap Approve By Proxy.
- Type the reason for the proxy approval. In this instance, the Dean on duty sees that parent approval has been granted and the two Deans who would normally approve this students' leave request, are not on campus at this time. Enter the reason for Proxy Approval and tap OK to submit the reason for proxy approval. Once Proxy Approval has been successfully registered, tap OK on the confirmation message.

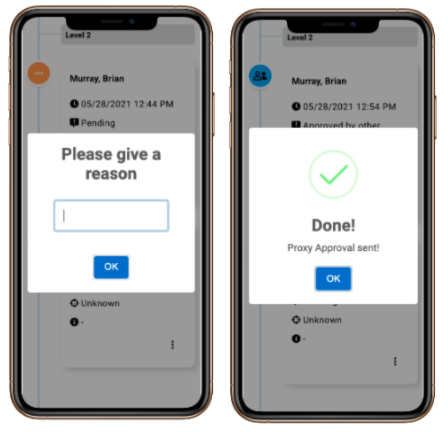
- Now we see for this Level 2 actor that the leave was "Approved by other," as indicated by the blue icon and note. Next to the proxy approver's name, we also see noted the reason for the approval. Scroll back up to the top of the Leave Details screen and click the X in the top left corner to exit. Since the Dean's office was the final actor in the approval process, the leave status has been updated to Approved and the Dean's Office actor icon is now colored Blue, indicating that the leave was Approved by other at that actor level.

Suspicious IP Address Approval in Manage Leave
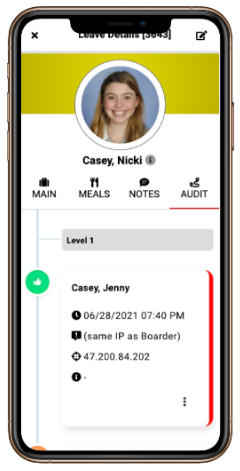
1. Approving Parent/Host IP address = Student IP Address
When a leave request is created by a student and the Parent or Guardian's approving IP address matches the leave creation IP address of the student. This will indicate instances where it is possible that a student is attempting to approve leave as the parent.
2. Approving Parent IP address = School Network address
When a Parent or Guardian's approving IP address matches the school's IP address. This will indicate instances where it is possible that a student is attempting to approve leave as the parent from the school's identified network.
SISO’ing a Student Back on Campus from Leave
- Select the Location Icon in the top right corner of the Leave Details
- Select the Location to SISO the student back to from Leave
Student Profile
This screen provides access to the current student’s profile information and logged report data.
It represents to the Mobile App, what the Student Sidebar represents to the Reach Web Portal.
This area is a set of viewing screens only, there are no actionable transactions. Phone Numbers and Email Addresses highlighted Blue, once tapped will prompt the required service within your Mobile Device to action.
Icons
Each Student Profile provides a series of tab icons that provide access to parts of the student's profile within Reach.
- Student contact information
- The student's associated contacts. Eg; Parents, Hosts, Guardians
- Recent Pastoral records for the student
- SISO – Sign In/Out records for the student
- Recent Rollcall records for the student
- UFD’s (User Defined Fields) and Quotas for the student
- Recent Leave records for the student
MORE …
Tap on the More button from the home screen to open extended functionality.
The available actionable sections will differ due to Login Type. Eg; Staff, Student, Parent
Program NFC
Here you can program any number of NFC Tags.
NOTE: Your Mobile Device may not support NFC writing.
To Write an NFC, simply follow the prompts to select the Entity, give the new NFC a name, assign a security code and tap the Red Write button to complete.
QuickGuide Article: Using NFC Tags for location tracking
Surveys and Lists
Items are created and managed by your school, this feature allows an unlimited number of Surveys and Lists to be provided to students, parents, and staff. These are saved to your Reach Portal and are historically reportable.
TUTORIAL: How to Create a Survey
PDF: Lists Manager
My Account
- Name, Email, Phone, Date of Birth, Gender, and Address.
- Username, PIN, Security Question, Security Answer.
Diagnostics
This page provides one simple option, Run Tests.
Support Website
This opens the Reach Help Centre in an External Web Browser.
The Support site areas are;
Your Area
Sign-in to activate Tickets. Here you can Create, Submit and View your previous logged Tickets
Knowledge Base
Your Library of data - Articles, User Guides, PDF’s and Tutorials.
Community
Be involved in the Reach discussion, scroll down or search recent comments.
The Reach team are active participants in the Community, answering questions or working with the Development team to provide solutions.
Change Log
The Change Log is a new feature added from June 2020.
This change log is a View Only area.
About
A brief about the Reach Platform and current Copyright.
Debug
An internal system to send data from your Device to the Reach Support team.
This feature is to compliment your Current Ticket with the Support Site.
NOTE: Sending this to Reach Support does NOT mean a Support Team Member will contact you.
To create a Ticket, please visit the Support Website
Quick Link: Reach Help Centre
School Management
This section is provided for those requiring access to multiple schools.
Eg; A Staff Member, Teaching at different locations.
Logout
When the button is tapped, a pop-up confirmation will ask if ‘you are sure’, as you will be logged out of ALL your attached schools.
Related Articles
ARTICLE: Student Mobile App User Guide
The Reach Mobile App is designed for use as a transaction platform, it is free and is available for use by all students that have a user account on your Reach Portal. The Mobile App provides access to the major of transaction elements for student ...ARTICLE: Parent Mobile App User Guide
Parent Mobile App User Guide The Reach Mobile App is designed for use as a transaction platform, it is free and available for use by all parents/guardians that have an existing user account. The Mobile App provides access to the majority of ...ARTICLE: Reach - Staff Primer
Welcome to Reach Student Life Management The Reach platform is the global leader in software systems for boarding schools, day schools, and camps. It provides a comprehensive set of features that help manage student populations and duty of care. ...ARTICLE: Reach Events
Reach Events is an efficient management tool for organising, sharing and managing recreation activities, excursions or events being held by your school. Integrate with your Reach database Reach Events provides a seamless integration with your Reach ...ARTICLE: Create Pastoral Report
Pastoral record keeping and historical data is an important part of student life management and the Reach platform allows you to maintain/view/export relevant records of student behaviour over time. Create Pastoral Reports GO TO: Pastoral Management ...