ARTICLE: Student App - Leaves and Quick SISO
Reach Student App - Leaves and SISO
Students are able to submit their leave requests and change their location through the Reach Student Life Mobile App. The home screen of the Reach Student App displays their current location based on SISO movements within the system. The Activity Metrics displays a snapshot of up-coming leave requests and their approval status.
Quick SISO - Changing Locations
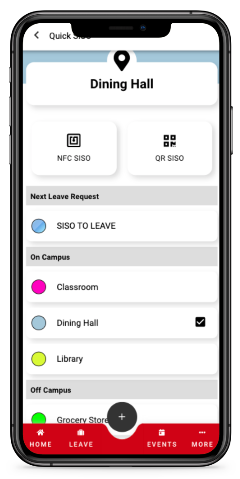
Students are able to change their locations within Reach by selecting Quick SISO in one of two ways; either by selecting
SISO in the
Current Location widget or by selecting the
Location icon in the top right corner of their screen.
Quick SISO - Changing Locations
The student's current location will be displayed in the banner at the top of their screen and will have a checkmark next to the location in the list below. Based on your school's location settings, various On and Off Campus locations will be listed as options.
To SISO to another location,
tap the new location - the student will see their location change on their home screen in the Current Location widget.
If your school utilizes QR Codes and/or NFC tags on campus to access locations, students will see the option to change their location by scanning one of the two just below their location banner. After a successful QR Code scan or NFC scan, the student will see confirmation of their location change.
If your school's configuration settings allow for students to "SISO to their Next Leave" via Quick SISO, students will see above the On Campus Locations the option to "SISO to their Next Leave" which will move their location to their approved leave requests' predetermined location.

Student Quick SISO settings are configured within the Reach website portal in System Configurations to allow access to this Quick SISO Widget and whether On and/or Off Campus locations are displayed as options. Configuration settings will also determine if students are able to SISO to their next leave, SISO when returning from a leave and if they will see QR SISO and NFC SISO widgets.
Leave Requests
Viewing Existing Leaves
Creating a New Leave Request
To create a new leave request, select the plus button in the bottom center of the screen and chose
New Leave Request. Follow the series of prompted screens to input the travel details; Leave Type, Departure and Return Dates/Times, Transportation methods, Host information, Destination and Notes, as well as if it's a reoccurring leave. Students have the ability to select multiple legs of transportation for their departure and return. For reoccurring leaves, select the frequency and duration that the leave plans will repeat. Prior to submitting the leave request, review the leave details and make any changes if needed.