ARTICLE: Student Sidebar Comprehensive
The
Student Sidebar is provided to quickly access individual student information at
all times from any screen within the Reach web portal. This feature displays key
information and historic data from the student’s profile, including; the contact
details of the student and their associations (parents/hosts), rollcall
attendance, leave history, pastoral reports, daily timeline quick view and the
extensive student summary.
How to Access
As
this feature is available at all times, access is quick and easy.
Use the menu icon in the top-right corner of every screen, the Student Sidebar will slide open, then select the required student.
Alternately,
when available throughout the Reach platform, click on a student's name
to directly open their Sidebar menu.
How to Navigate
There
are four key sections presented as quick tabs to separate the data and
information, they are as follows; Summary, Associations, History and Quick
Note.
Within
each tab, simply scroll up and down to view the content and click the icons and
information items as required, these may open as extended panels up and down,
or slide out. Some links will open in different ways to provide additional information
and/or functionality, such as pop-up windows, tab pages in Reach and connected
services such as Outlook for email.
When
finished with the student sidebar, simply click the menu icon again to close.
NOTE:
- The Student Sidebar can be customised, as many functions and features can be enabled and managed by your school to suit operational requirements and protocols.
- Terminology within Reach is managed by your school via system configuration. This can affect such terms as boarder/student, year/grade, and house/dorm.
Student Sidebar Tab Sections Explained
Boarder Summary Tab
The default tab provides the majority of the functionality and information for the selected
student, delivered via five key sections;
First, the basics, with student profile
photo, name and current location.
Profile photo
- Click the photo to open a pop-up window with an enlarged photo to view
Location icon
- Displaying the current location and corresponding colour
- Click to open the individual kiosk for that student
- Conduct a quick location change
- SISO them to their next approved leave
- View details of current or next approved leave items
- View their upcoming events and register or decline their attendance
Boarder Timeline
- The off-centre horizontal bars icon will slide out the Daily Timeline feature, enabling you to quickly view all interactions for that student within Reach for the selected date
Boarder Summary
- The horizontal bars icon will open a Reach tab page with the full summary feature
- This provides an extended layout to view greater student profile data
Padlock Icon
- Click to open the Restriction Details pop-up window
- Here you can manage Gating/Grounding, create notifications or view the gating history
Envelope icon
- Click to open the email service on your computer to send a direct email to that address
Person icon
- Click to open the student’s personal profile within People Management for editing
- Accessibility depends on active permissions
Number icon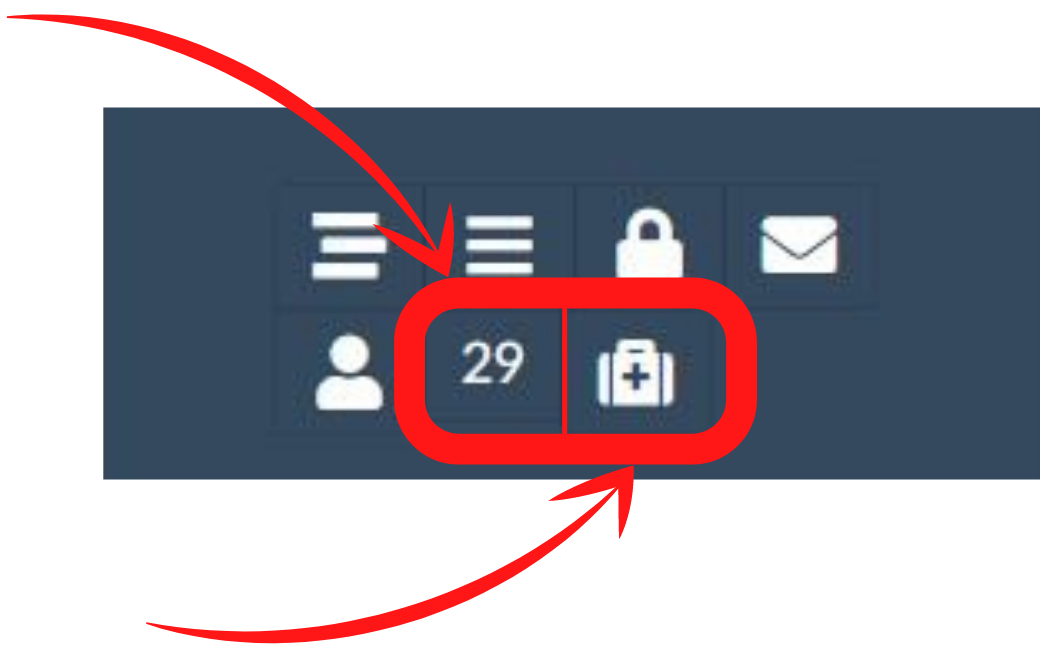
- This indicator displays the student's current pastoral points
- Visibility depends on the use of the pastoral points system within your school portal
- Detailed information is provided via this Article: Pastoral Points
Health icon
- This feature can provide a wide range of data once enabled
- Accessibility will depend on your school’s active medical system integrations
- House Icon - House/Dorm
- Bed Icon - Room number
- Calendar Icon - Year/Grade
- Phone Icon - Contact number, when clicked will open your computers connected service
- Envelope Icon - Email address, when clicked will open your computers connected service
- Location Pin - Home address, when clicked will open a Reach page tab as a Google Map
- Gift Icon - Date of birth (Age)
- Each field name and data is created and managed by your school
- UDF icons are also used in the Kiosk View to provide quick information
- Detailed information is provided via this Article: UDF’s Display Information
Fifth, Quotas, a customisable feature that
allows you to create allowances for approved leave items, locations and other
events, with alert notifications and consequences.
- Each fraction displays a number of quotas used and remaining
- To click on a fraction will open a small pop-up window to adjust and update the number of quotas used for that item
- Accessibility depends on active
permissions
Associations Tab
This
tab displays the contact information for those associated/connected with the selected
student, these play a critical role in the Reach system, as they determine with
whom the student is permitted to depart with on approved leave.
Leave
requests can only be created with people (hosts) who are associated with the selected student.
If a parent has added a new host and they have not been associated (connected) via
the personal profile of the student, then that person will not appear as an
approved host to be selected.
Information regarding host profiles can be found with the following Articles;
Quick
navigation
The
functionality of the data and how it is created is the same as the student
contact information, and must be managed via the personal profile for each individual.
Each
contact listing starts with their name and the applied title for quick
reference (father/host/emergency contact etc), this is the association type, as
set per host in the student’s profile, also during setup, notifications can be
set per association.
The
listed associations connected to the student, are separated into Parent and
Host groups, each header is accompanied with an indicator for quick reference
to show how many associations/contacts there are per group.
- Phone and email will open your computers connected service
- The home address will open in a Reach page tab as a Google Map
- All data is managed by your school
History Tab
This
tab provides a quick view of historical data for the selected student, split
over six categories, each with an easy filter.
The
data recorded from the Reach portal for your school, resides in the live Reach
database forever, unless a request is made for a rollover purge.
Quick
navigation
Each
section of this tab collates the data relevant to its heading, click the +
icon for the required heading, the panel will side down, if you see the text
“No data for this time”, simply click the filter and adjust the data segment; the current
day, the past week, month or for all time.
Leave History
The
Leave History view provides a full list of all leave items that the student has
taken. This includes Exeat leave, quick leave and unused leave requests. Each leave
Item is represented by a suitcase colour card as green/orange/red and listed
down the page in chronological order, with the most recent item first. Each
leave item shows the requested date/time, the destination and date/time the
student signed out.
To
click on any leave item will open the leave details screen for that item, this
allows you to view the full details, and the audit trail of approvals.
SISO
stands for 'Sign in / Sign out' and the panel is a view-only area.
Select the required data segment with the filter and scroll through the items.
Each
card is colour coded to the location the student checked into, together with
the location name, the date/time of the check-in and the name of the staff
member involved.
All
locations and colours are created and managed by your school.
This panel shows a green tick (attendance) or a red X (absence) icon
beside a date to reflect the records for that day, with the icons in order of
time from left to right.
Hover
over an icon to reveal the data for that record, including the rollcall
category, the staff member and the date/time.
Pastoral History
This panel shows all pastoral report items for the selected student,
these are listed in chronological order, starting with the most recent at the
top, and each item is colour coded for a quick visual reference. Positive - green / Negative
- red /
Neutral – orange.
Each
pastoral item shows the report type, the date/time it was submitted, and the
staff member that created the item.
To
click on any pastoral item will open the pastoral report details screen for
that item, this allows you to view the full details, and the data log listing
any additional items or report updates.
Pastoral
Types are managed by your school, however, some are set by default as part of the
initial Reach setup.
Medical History
Similar
to the pastoral section, however, this section only lists medical or medication pastoral report types.
These
are listed in chronological order, starting with the most recent at the top,
each item shows the report type, with the date/time it was submitted, and the
staff member that created the item.
To
click on any item will open the pastoral report details screen for that item,
this allows you to view the full details, and the data log listing any
additional items or report updates.
Wellbeing History
Similar
to the pastoral and medical section, however, this section only lists wellbeing pastoral report types.
Listed
in chronological order, starting with the most recent at the top, each item
shows the report type, with the date/time it was submitted and the staff member
that created the item.
To
click on any item will open the pastoral report details screen for that item,
this allows you to view the full details, and the data log listing any
additional items or report updates.
Quick Note Tab
This
section allows you to quickly add a pastoral note that relates to the selected
student.
- Simply select a category from your full report type listing
- Then click the Edit button to open the Record Pastoral Note section
- Enter your report details as required
- Then click done, this will save and close the tab
- Click the Staff button, this will open the Contacts page, highlight the staff members to inform
- Once all are highlighted, click the green select button, this will save and close the tab
- Select the Access Level required from Staff-only, Sensitive, or Confidential
- Add or adjust the pastoral score if required
- A number may appear by default, this is connected to the pastoral report type
- Select or deselect the communications method required
- Once all is complete, click Save Note
The
quick notes tab also provides fast access to open the full pastoral report
platform. Simply click the blue 'Open as Report' button at the bottom, this
will open a Reach tab to the Create Pastoral Report page, with full access to write,
save and submit a detailed report.
Detailed
information regarding pastoral reports, please view the following; Article: Create
Pastoral Report
Pastoral
Notes can also be entered on-the-go in the Reach Mobile App.
Related Articles
ARTICLE: Student Summary
This Dashboard is provided to view the collated information of individual student profiles within your schools the Reach Portal. The goal of the Summary dashboard is to provide a holistic view of student activities, display all relevant transactions, ...ARTICLE: People Management - Personal and Security details
When creating or managing contact profiles, the Personal and Security tab details become very important to the function of profile data across your schools Reach portal. All profiles from staff, to students, parents, hosts and guardians, require five ...ARTICLE: Gating or Grounding Restrictions
Gating and Grounding procedures allow for flexibility on how students can be restricted in REACH. The Restrictions Modal is used to implement your Gating or Grounding rules. This modal allows you to select between a number of restriction options ...ARTICLE: How to setup Emergency Contacts
The emergency contact details for any Reach user can be setup view their individual profile. Main Menu >>People Management >> View Contacts >> Profile View Contacts The People Management page presents current/active contact profiles via a table view, ...ARTICLE: Viewing Student Pastoral Notes
Understanding and tracking pastoral information for students is a vital element of building historical data, and developing pastoral care. Pastoral data can be viewed and reported in many ways, so as to mold individual student outcomes or to create ...